
Learn how to easily restore old wood furniture with a few simple products. You can make your furniture shine, no sanding required!

This post contains affiliate links, which means I make a small commission at no extra cost to you. See my full disclosure here.
I’m a sucker for old stuff- houses, furniture, textiles, books. All of it. I love the history and stories they hold. I love to think about all of the lives they’ve seen. All of the happy times and sad times, too. Whenever I need something for my house, I’ll always try to find an old one first, if at all possible. The only downside to this is that vintage and antique items sometimes need work, and I don’t always have the time to take on a project like that.
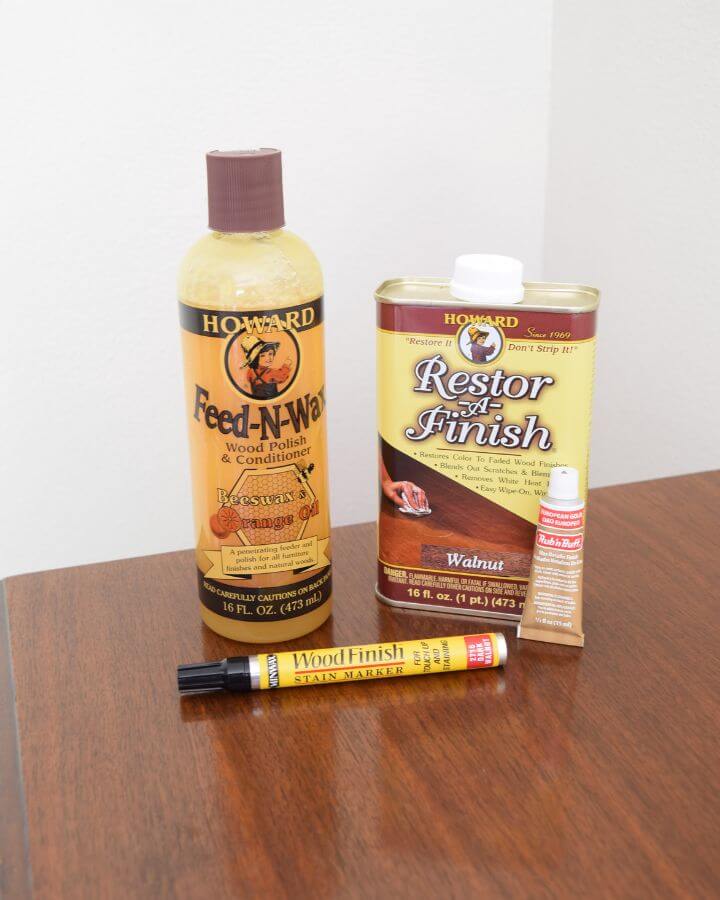
Luckily, I have some tried and true products that I pull out whenever I need to restore wood furniture. They make it so quick and easy! This is not a sponsored post; I just really like these and use them in real life.
They are:
- Howard Restor-A-Finish
- Howard Feed-N-Wax
- Rub ‘N Buff
- Kilz Primer (not pictured)
- Minwax Wood Finish Stain Marker
When I recently found myself in need of a couple of dressers, my first stop was my favorite antique shop.
And happily, I was able to find just what I needed for a great price, but both of them had flaws.
Here is the first one.
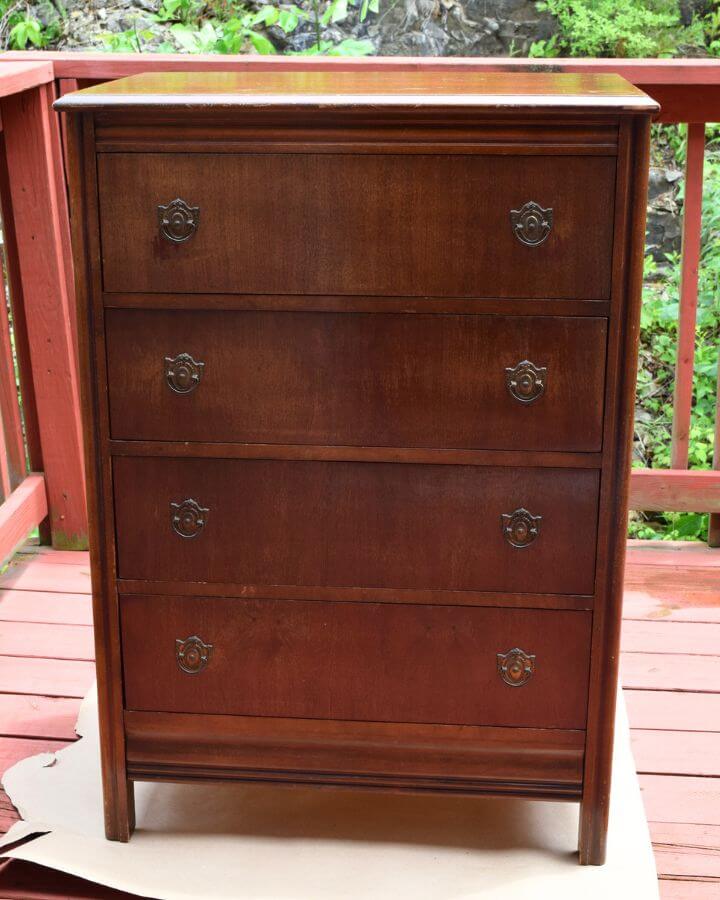

I liked the size, color and little handles, but the finish was dull, dry, and badly scratched, the handles were tarnished, and it smelled REALLY bad. I wanted to fix these issues before I put clothes in it.
How do you restore the finish of old wood furniture without sanding?
The first thing I did was take it out to the back deck.
Then I decided to tackle the finish. It was covered with decades of dust, so I wiped it down and cleaned it really well.
Next, I got out my Restor-a-Finish in the color Walnut and wiped it on with a rag. It has strong smell, so you’ll definitely want to do this in a well-ventilated area.
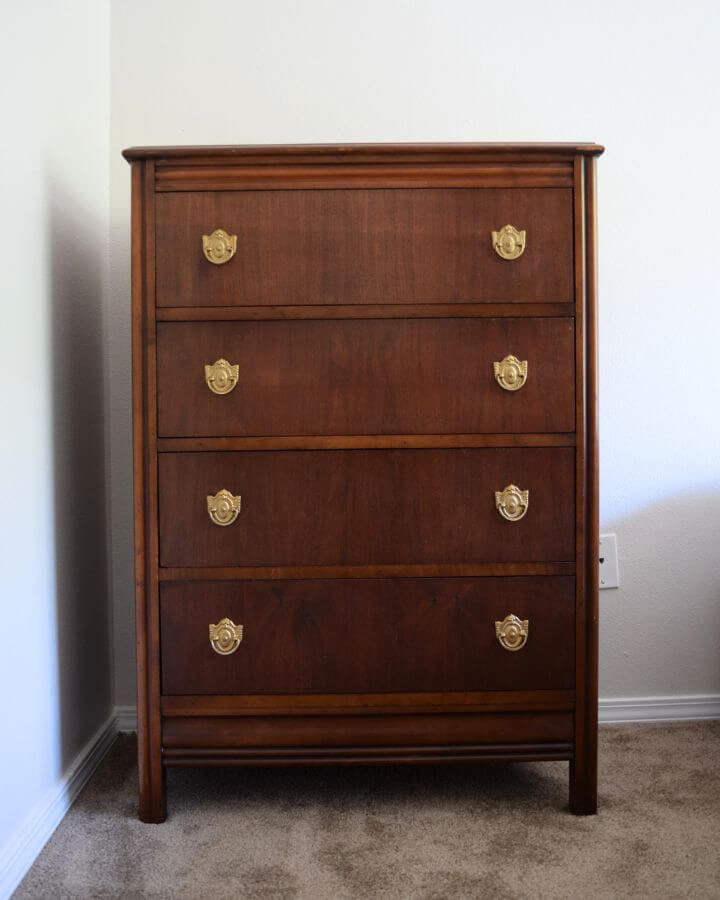
You can clearly see the difference after I put it on. A lot of the scratches look like they’ve completely disappeared.
It’s definitely not perfect like it would have been if I’d completely stripped it down and sanded it, but the difference is night and day. Also, this whole step took less than an hour. I love a quick project!

After the Restor-A-Finish dried completely I rubbed on some Feed-N-Wax. The finish was pretty dry when I brought the dresser home, so I just wanted to help protect it a little more.
I’ve used Feed-N-Wax before on my dining room chairs. The finish on them was dry and scratched. It evened everything out and gave them a beautiful luster.
How do you refresh old metal hardware?
My next task was to shine up the handles. My first thought was to clean them because they were pretty grimy. The back sides of them were a nice brassy color, so I hoped to clean the dirt off and reveal the original color.

But as I cleaned, the original gold color came right off with the dirt. The handles were silver underneath the brass paint.

After I recovered from my disappointment, I pulled out the Rub ‘N Buff. I have a variety of Rub ‘N Buff colors, so I picked European Gold because it was the closest that I had to the original color of the handles.
Rub ‘N Buff is so easy to use. I normally put on a disposable glove and use my finger to rub it onto my projects, but these handles had a ton of little grooves so I used an old craft paint brush instead.
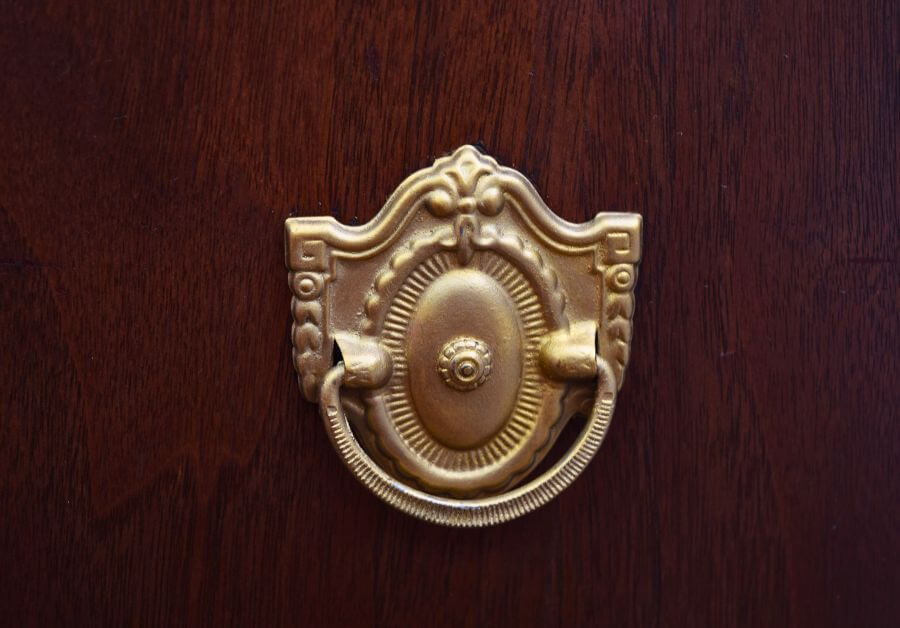
I like that they still have a metallic finish. They look much brighter and cleaner than they did before! I think they must have looked similar to this when they were new.
How do you get a bad smell out of a dresser?
I mentioned earlier that this dresser smelled awful. It really did. On top of smelling very musty, it smelled like it had been stored in a garage for a long time.
I hoped that fresh air, sunshine, and the cleaning I gave it would help with the smell, and to a certain extent it did, but not nearly enough. I searched high and low for a way to get the smell out. For days, I read every article I could find online. I promise, if you can think of it, I tried it. Nothing worked completely, the smell still lingered strong enough to give me a headache and I didn’t want to put clothes in it.
Finally, I decided to paint the inside. I used KILZ primer to seal it all in. I took the drawers out and painted the inside of the dresser. Then I painted the insides and undersides of the drawers. I was careful to skip any part that might show from the outside or where wood might rub against wood.

And it worked! The dresser smells fresh and my clothes have no weird scents on them. Painting might not be an option for really special pieces of furniture, but it was a quick and easy solution for mine.
Here it is again. You can see that none of the primer is visible from the outside.

How do you fix small chips and scratches on wood furniture?
The second dresser was actually in great shape. Its only problem were a few chips in the wood veneer of the drawer fronts. I forgot to take a picture of what it looked like before, but the wood under the veneer was a light color and it was very noticeable against the darker stain of the rest of the piece.

I simply used my Wood Finish Stain Marker in the color Dark Walnut to fill in the chipped areas. Again, it’s not absolutely perfect, but the chips aren’t visible unless you’re looking for them. In the picture above, you can’t see the chips at all. A stain marker is a great solution when your finish is mostly in good shape, and you just need to fill in a few scratches.

Easy peasy!
Have you tried any of these products to restore your wood furniture? I’d love to hear about your experience with them!
Pin it for later!

Leave a Reply