
Sewing your own grow bags is so simple! Learn to sew an easy grow bag out of any material of your choosing. Know how to sew a straight line? You can do this!

This post contains affiliate links, which means I make a small commission at no extra cost to you. See my full disclosure here.
It’s my goal at our new property to grow as much of our own food as possible. Part of my plan to achieve this includes perennials like berry bushes. I picked up several dormant blueberry, blackberry, raspberry, and strawberry plants the other day. Eventually, I’ll plant these out near our new home. I didn’t want to plant them in the ground here because I want to take them with us when we leave.
Until then, I needed some kind of container to plant them in. Pots are expensive, especially when you consider how many I would need. I really didn’t want to spend money on a planter that would be so temporary. I needed to work with what I already had. Enter the grow bag.

Because I used cotton fabric that I already had on hand, this project didn’t cost me any more money. Yay for free! Cotton is biodegradable, so this isn’t a long-term solution, but it’s perfect for the temporary planters I was looking for. If you’re looking for a longer-lasting material, I suggest using a quality landscape fabric instead. If you follow this tutorial, then you can use any fabric that suits your needs.
UPDATE: I ended up using these planters for a full growing season. The cotton fabric did the job for the length of time I needed them, but they were ready to be tossed out at the end of the season. Would I make these again in a pinch? Absolutely! Just keep in mind that if the planters need to be moved frequently or last longer than a single growing season, you should look for sturdier material than I used. The directions will stay the same.
Here’s what you’ll need for one grow bag
I made two sizes of bags, a large size for the berry bushes and a small size for the strawberries.
Large size
1 yard of fabric. Mine measured about 36″ x 42″.
Small size
1- 18″ x 21″ fat quarter. If you’re unfamiliar with the term, a fat quarter is just a quarter of a yard of fabric. It’s cut like this from a full yard.

If your fat quarter ends up a few inches off either way, that’s OK. It won’t affect the final result. Fabric widths vary between manufacturers. The instructions are the same for whatever size you choose to make, so tailor your bag to your needs.
Let’s sew a grow bag!
Fold your fabric with right sides together and sew along what is now the longer edge with a 1/2″ seam allowance.

Fold the top of the tube down to meet the bottom edge, matching the raw edges together. The right side of the fabric will now be facing out and it should still be a tube. If you are using a patterned fabric, the pattern will be upside down.

Make sure the seam is lined up with itself and is on one side. Mine is on the left. Pin all of the bottom raw edges together and sew them with a 1/2″ seam.

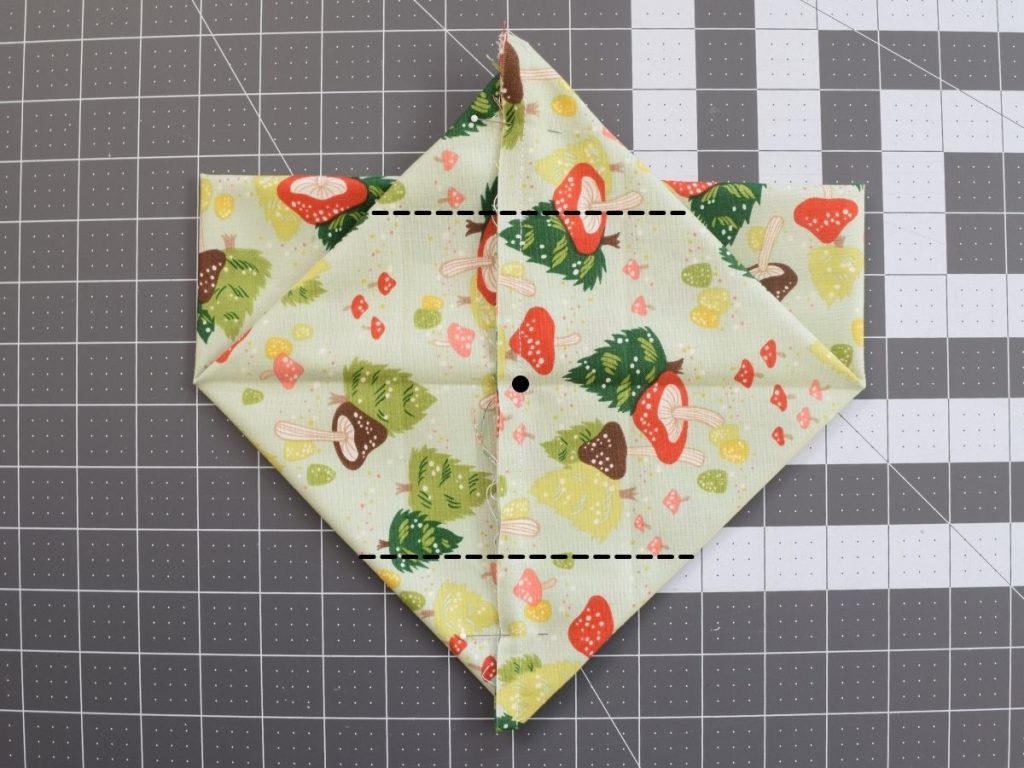
Refold it so that the side seam is in the center.

Flip the bottom flap up so that the bottom is exposed and pin the layers in place.

Mark the center of the bottom seam and bring the corners at the top and bottom to meet it. Draw lines where the folds are created and sew across them.
Turn your grow bag right side out. I didn’t trim the flaps, I just left them there to add a little more structure to the bottom of the bag.

Now you can fill it up with soil and plant your seedlings!
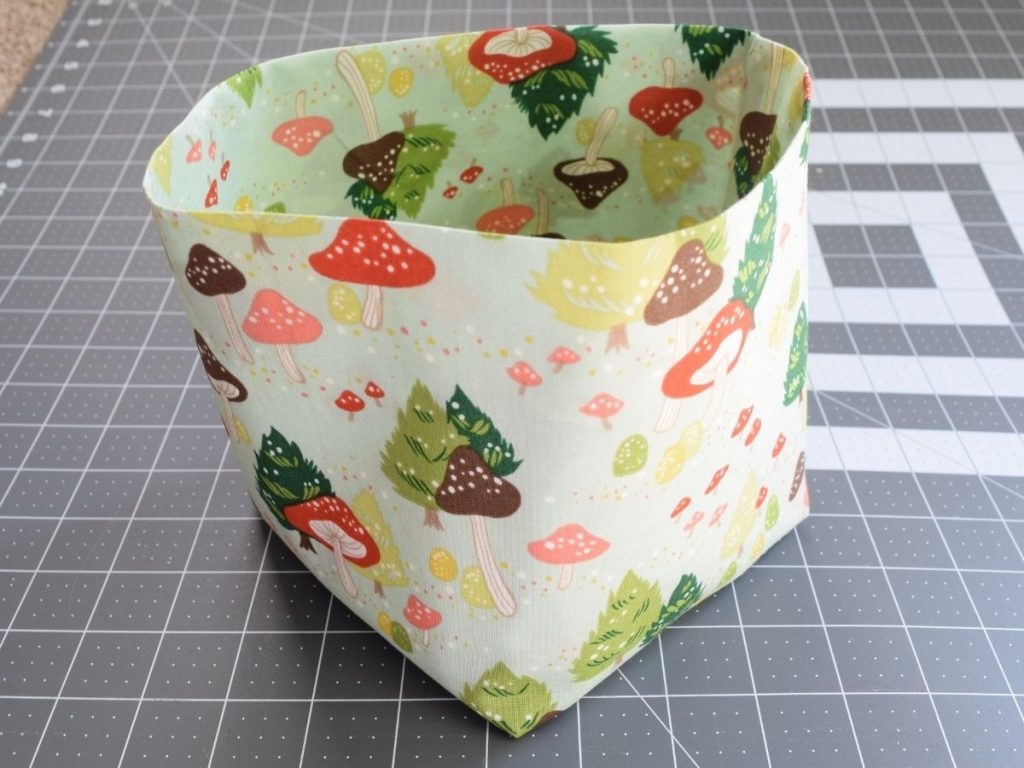
Aren’t they cute? They’ll look even cuter when the plants start to fill out.

Now get sewing! You’ll have a handful whipped up in just a few minutes. It goes even faster if you sew them in assembly line fashion.
Helpful tools for this project
Pin it for later!

This is such a fun and easy process! I love it! Thanks so much for sharing.
It really is so easy! They come together quickly!
What a fun post. I love this, & I am going to give this a whirl!
Thank you, Dusty! It’s a cute little project, especially if you use some fun prints!
I love this idea!!!! I will make some….I think I might cut a square piece of cardboard, wrap it with plastic or place the cardboard in a plastic bag, to fit at the bottom for a little support. Yours look adorable!!!
That’s a great idea!
I got confused about sewing the raw edges. Do we sew all four together, or two together? And I am totally confused on how to do the flaps. Is there another place or video that shows it better? Thank you.
Yes, sew all four raw edges together. I’m sorry if I wasn’t totally clear. I’ve reworded some of the directions so that hopefully they make more sense.